 |
DIY • Do it Yourself • Weekend Projects • BIG Projects • LITTLE Projects | |||||
|
DIY • Do it Yourself • Weekend Projects • BIG Projects • LITTLE Projects | |||||
How Do I Share My How-To?It's really pretty easy, pictures and videos of the steps it takes to complete your project are stored on YouTube and picasaWeb. Once your "final" video is stored on YouTube, your project will show in the listings on the site. All this is controlled by our Creator's Tools. Basically, you start a project by writing up the project idea. Step 1. Sign up for a free Creator's Account to gain access to the Creator's Tools. Step 2. Login Step 3. Push the "Create New Project" button on the Creator's Tools. Make a name (you can change it later) for your project. And describe your plans to use as notes to guide the creation of the steps. Step 4. When you've finished providing all the steps to your project, shooting the videos and saving to google video via the Creator's Tool Panel, you are ready to write the introductory paragraph with an interesting story of how you did it, or how you do it in the case of a professional services presentation. Step 5. Last but not least create and upload the video (to YouTube) which is the video that will be used to summarize the project. If you were building a robot, this final video would show the robot running around, doing fun things that will inspire others to create their version of your project. That's it... Watch the views and ratings for your project pile up along with the sales commissions! Or get a customer because you showed how you remodel a house. |
FAQ About Becoming A CreatorQ. Why would I go to all that work, building something, then put it on a website like C What I Can Do? What's the point? A. Actually, there are a couple of forms for a reward:
|
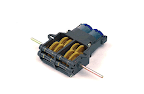
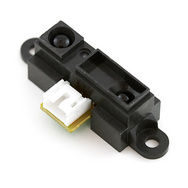
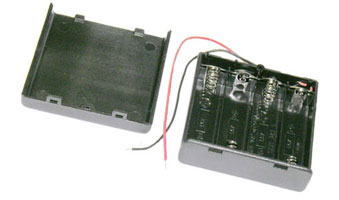
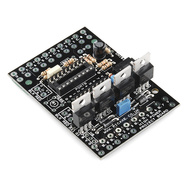
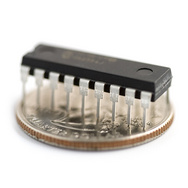
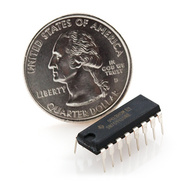
Easy Cheap Robot Weekend Project ... 32014 Views Author's name: WeRbots Convert an old broken down Rumble Bot into a wandering autonomous robot. It`s cheap and really easy to make an old Rumble Bot into a new, more self oriented obstacle avoiding Robot. Rumble Bot = 5 - 30 bucks (broken ones are fine, you are going to "gut" the electronics anyway. picAxe Motor Control PC board (comes with picAxe 08 chip) < $16 bucks picAxe 08m chip (less than 4 bucks) IR "Eyes": around $12 dollars, works in every light level, impervious to false triggers. A 0.22 uf capacitor on the output of the above to keep it from jittering the interrupt pin... My total cost = $35 USD... It`s an easy way (programmed in BASIC) and cheap way to learn about autonomous robots. Author's Assigned Keywords: Cheap Robot Easy to Make Robot Weekend Project Robots Robots robotics (ad) Get A Discount Rumble Bot or any 4 WD body The Rumble Bots are getting harder to find since the big push to put an arduino inside. You can make just about any four wheel drive (or even 2wd with dragger wheel) into an autonomous robot. You could use mechanical "feelers," but it`s more exciting and a little more money to use an IR range finder system to let you know when objects are in the way. With a decent `avoid` algorithm, you`ll have instructions left over. The simplest program allowing the unit to operate as shown in the video can be expanded to include other items. But with the simple picAxe motor driver board, everything is pretty simple to start with. Take it all Apart I took everything out of my Rumble Bot and rewired the motor and speaker, etc... This looked like the bot was getting a hair cut, but made things work smoothly and nicely. Some plastic will have to be removed to make it all work. I had to use a Dremel tool, to get the head of the robot to fit nicely. Moving the extra plastic out to mount the driver board was simply clipping with a pair of sharp cutters. Put it back together Now you mount the IR detector on the body. Just on the outermost edge of the body. This allows you to adjust the height by adding shims as needed before tightening the mounting screws. If you don`t, you`ll find your robot rejecting the edges of a carpet or other simply climbed object. The beam should not be too low, nor too high, as it will run into objects and get caught if the beam is too high to recognize items. Software `------------------------------------------------------- ` ` picAxe Motor Control ` Created by: Jim Huffman ` Rev 0.1 October 18, 2007 ` Rev 0.2 October 20, 2007 JH ` Rev 0.3 look around functions begun Oct22, 2007 ` Rev 0.4 Changed Motor Drive approach Nov 04, 2007 ` `------------------------------------------------------- ` ` Initialize System Wide Values ` ` Directives ` Select and initialize chipset #picaxe 08m ` ` System resources symbol fwdM1 = 0 `(pin 7)(Careful, Used in Programming) symbol revM1 = 1 `(pin 6) symbol revM2 = 2 `(pin 5) symbol IRsense = 3 `(pin 4)(input only on 8 pin) symbol fwdM2 = 4 `(pin 3) ` (pin 1 Vdd, pin 8 = Vss, pin 2 = Serial In) ` ` Motor Control constants ` assumptions: ` open means no output ` motors are M1 and M2 ` powered by 4x 1.2v AA cells built-in robot ` vars symbol storResult = w2 ` place to put ADC10 results symbol storResShrt= b4 ` place to put adc results ` ` `-------------------------------------------------------- ` Code Blocks: ` let dirs = %00010111 ` short wait before main routine begins setint %00001000, %00001000 ` ` main demo routine `It goes like this ` gosub (fwd,rev,leftspin,rightspin) ` pause - long as you want it to do the appropriate subroutine ` gosub stopAll - You have to stop it from driving, don`t forget this ` That`s how you make the world go round ` init: `gosub fwd `basically, you make it go, then you pause for running time `obviously, an interrupt loop makes it quit driving anytime gosub stopAll `don`t forget to stop the action you put in motion pause 3000 `think and abandon all hope loop main: gosub fwd pause 50 goto main interrupt: `if pin3=1 then interrupt gosub stopAll pause 20 `think a second little machine :-) gosub iSpy setint %00001000, %00001000 return ` Look to see if a spot is clear, then head in that direction iSpy: gosub rev pause 600 gosub stopAll gosub leftSpin pause 700 gosub stopAll if pin3 = 1 then `still in trouble that way gosub leftSpin ` call yourself until you`re out of trouble pause 300 gosub stopAll pause 100 if pin3 = 1 then `still in trouble that way gosub rev pause 300 gosub stopAll gosub rightSpin ` call yourself until you`re out of trouble pause 400 gosub stopAll pause 100 return endif endif return ` found a hole - start driving again `----------------------------------- ` Drive Routines ` fwd: high fwdM1, fwdM2 pause 30 return rev: high revM1, revM2 pause 30 return stopAll: low fwdM1, fwdM2, revM1, revM2 pause 30 return leftSpin: high fwdM1 high revM2 pause 30 return rightSpin: high revM1 high fwdM2 pause 30 return More? You can do some pretty fun things. Like actually move the whole robot back and forth till it finds an obstacle free direction to go. Or it runs up on things it sees, using ADC to measure the actual distance and then look around for something else to run up to. Speed control is also possible, you can PWM out on 8 bit chips, thus you can allow the robot to go kinda slow while it looks around, then speed up when it is out in the open. Much fun can be had with the simple bot as-is, but you can do more, like put sensors in the bots fists so it can detect objects it runs into despite the IR Detector. Also, there is a speaker you can bleep out tunes and you can put a rear bumper to discover objects when backing up. A cheap-o like me simply finds this much fun for such a small price too much hobby robot fun!!! It's Easy To: C - What - I - Can - Do • Sign up - Get ID and Password• Plan and Create a Project That Someone Might Enjoy and May Even Want to Build• Link to your creation on your favorite social networking site or blog.• Become famous! Because your projects get a lot of Hits!
|
By Creators DoctorZoidberg: Converting a Flashlight to LED DoctorZoidberg: Home Project: MUTE TV Wearable TV Muter! DoctorZoidberg: Scare Crow - For Modern Gardens - Home Project jim: CwhatIcanDo Website jim: Tour This Website PaulSandin: Butler, a low-cost mobile robot base WeRbots: BEAM BOT: HexBug Exposed! WeRbots: Buggy Bot: Wire Frame Bot Body WeRbots: Easy Cheap Robot Weekend Project WeRbots: RFL Robot Out Of The Box Experience WeRbots: Robot Man: With Robot Demos WeRbots: Build Your Own Track Drive Robot WeRbots: Build a Robot In 5 Minutes WeRbots: i-Mon App WeRbots: How To Make A Virtual Robot in FLASH WeRbots: Droid From Motorola :: A Robot ? WeRbots: Robots Almost Anyone Can Afford WeRbots: How To Build a Robot in a Box WeRbots: picAxe 18m2 for robotics WeRbots: Build a Respectable Autonomous Robot WeRbots: On Line Neighborhood Watch WeRbots: Pong))))) WeRbots: Roboteer`s Guide to BeagleBone Black WeRbots: Autonomous Robot PVC "Pickup Truck" |
By Keywords Action Script 2: How To Make A Virtual Robot in FLASH Ajax: CwhatIcanDo Website Ajax: CwhatIcanDo Specs: RC2 Ajax: battle Android: Droid From Motorola :: A Robot ? Android: battle batting cage installation: Home Installation of a 4 Section In-Ground Batting Cage BEAM Robots: BEAM BOT: HexBug Exposed! BEAM Robots: picaxe 8m: Wall Follower Mouse gets Majorly Modded BEAM Robots: How to build simple analog balancing robots BEAM Robots: battle Block Watch Cam: On Line Neighborhood Watch Cheap Robot: Easy Cheap Robot Weekend Project Cheap Robot: How To Build a Robot in a Box Cheap Robot: Autonomous Robot Built From Power Chair Wheelchair commercial killer: Home Project: MUTE TV Wearable TV Muter! Convert Your Flashlight to LED: Converting a Flashlight to LED Create a Project: HELP :: How To Create a Project CwhatIcanDo HELP: HELP :: How To Create a Project Do it Yourself: Robots Almost Anyone Can Afford Do it Yourself: Scare Crow - For Modern Gardens - Home Project Do it Yourself: Wheelchair Works 3 Ways: Manual, R/C, and Autonomous Do it Yourself: On Line Neighborhood Watch Droid Smart Phone: Droid From Motorola :: A Robot ? Easy to Make Robot: Easy Cheap Robot Weekend Project entertainment: Home Project: MUTE TV Wearable TV Muter! FLASH Applications: How To Make A Virtual Robot in FLASH HELP: Tour This Website How To: CwhatIcanDo Website How To Build Cheap Bots: Robots Almost Anyone Can Afford How To Build Cheap Bots: How To Build a Robot in a Box How To Website: Tour This Website How To Website: CwhatIcanDo Website Infrared Proximity Sensor: Build Your Own Track Drive Robot IR Detector: Build Your Own Track Drive Robot Lighting Projects: Converting a Flashlight to LED logic analyzer: An affordable Logic Analyzer for the workbench. multi: Multi Media Messaging Device Mute the TV: Home Project: MUTE TV Wearable TV Muter! open source: An affordable Logic Analyzer for the workbench. picAxe: Build Your Own Track Drive Robot picAxe: picAxe 18m2 for robotics picAxe 08m: Robots Almost Anyone Can Afford picAxe 14m: picAxe 14m Motor Driver Board: Make Your Own picAxe 14m: How To Build a Robot in a Box picAxe 18m2: picAxe 18m2 for robotics picAxe 18m2: Weekend Project: Get Started With Robots picAxe 18m2: Build a Robot From A Power Wheelchair picAxe 18m2: Autonomous Robot Built From Power Chair Wheelchair picAxe 18m2: Wheelchair Works 3 Ways: Manual, R/C, and Autonomous picAxe 18x: How To Build a Robot in a Box picAxe 18x: picAxe 18m2 for robotics picAxe 18x: Build a Robot From A Power Wheelchair power wheelchair: Wheelchair Works 3 Ways: Manual, R/C, and Autonomous Quick Build Robot: Build a Robot In 5 Minutes RFL Robots: Building an RFL Inspired Upright Robot Base RFL Robots: RFL Robot Out Of The Box Experience robot bending: Morphibian Land Shark robot bending: Build a Robot From A Power Wheelchair Robot Man: Robot Man: With Robot Demos Robot Motor Control: Build the L298 H-Bridge Motor Control Robot Motor Control: Robot Basics Robot Motor Control: picAxe 14m Motor Driver Board: Make Your Own Robot Motor Control: Buggy Bot: Wire Frame Bot Body Robot Motor Control: picAxe 8 bit Motor Controller: Look Inside Robot Motor Control: How to build simple analog balancing robots Robot Motor Control: Build a Robot From A Power Wheelchair Robot Motor Control: Autonomous Robot Built From Power Chair Wheelchair Robot Pets: DogBot the Robo Dog : Robotic WatchDog Robot Pets: Operation of the Tri-Bot From Wowwee! Robot Pets: Robot Man: With Robot Demos robotics: Droid From Motorola :: A Robot ? robotics: Easy Cheap Robot Weekend Project Robots: BEAM BOT: HexBug Exposed! Robots: Robot Basics Robots: Buggy Bot: Wire Frame Bot Body Robots: Build a Robot In 5 Minutes Robots: Build Your Own Track Drive Robot Robots: Easy Cheap Robot Weekend Project Robots: How To Build a Robot in a Box Rumble Bot Conversions: Robots Almost Anyone Can Afford Security System: On Line Neighborhood Watch Select or type in a Keyword: Converting a Flashlight to LED track drive robot: Build Your Own Track Drive Robot Virtual Pet Robot: How To Make A Virtual Robot in FLASH web: CwhatIcanDo Website web 2.0 site: CwhatIcanDo Website web 2.0 site: CwhatIcanDo Specs: RC2 Weekend Project Robots: Easy Cheap Robot Weekend Project Weekend Project Robots: Weekend Project: Get Started With Robots |
Click To Expand / Contract Menus. View by Creator, Category, Keywords or Number of Views.