 |
DIY • Do it Yourself • Weekend Projects • BIG Projects • LITTLE Projects | |||||
|
DIY • Do it Yourself • Weekend Projects • BIG Projects • LITTLE Projects | |||||
How Do I Share My How-To?It's really pretty easy, pictures and videos of the steps it takes to complete your project are stored on YouTube and picasaWeb. Once your "final" video is stored on YouTube, your project will show in the listings on the site. All this is controlled by our Creator's Tools. Basically, you start a project by writing up the project idea. Step 1. Sign up for a free Creator's Account to gain access to the Creator's Tools. Step 2. Login Step 3. Push the "Create New Project" button on the Creator's Tools. Make a name (you can change it later) for your project. And describe your plans to use as notes to guide the creation of the steps. Step 4. When you've finished providing all the steps to your project, shooting the videos and saving to google video via the Creator's Tool Panel, you are ready to write the introductory paragraph with an interesting story of how you did it, or how you do it in the case of a professional services presentation. Step 5. Last but not least create and upload the video (to YouTube) which is the video that will be used to summarize the project. If you were building a robot, this final video would show the robot running around, doing fun things that will inspire others to create their version of your project. That's it... Watch the views and ratings for your project pile up along with the sales commissions! Or get a customer because you showed how you remodel a house. |
FAQ About Becoming A CreatorQ. Why would I go to all that work, building something, then put it on a website like C What I Can Do? What's the point? A. Actually, there are a couple of forms for a reward:
|
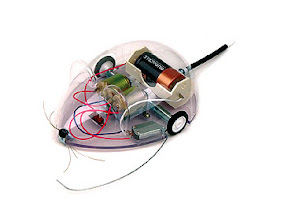
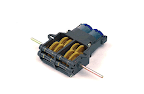
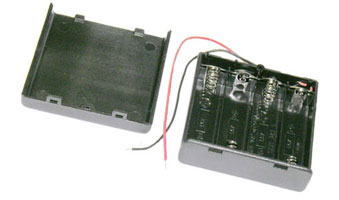
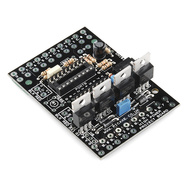
picaxe 8m: Wall Follower Mouse gets Majorly Modded ... 32055 Views Author's name: WeRbots Take a PicAxe brain, add an infrared "whisker" and a motor controller, transplant to an existing wall follower robot and you have: "CRAZY Mouse Bot on Steroids!" For the issues and tricks, here`s what I did: * Mount the Power Transistors right down at the motors, if you bend them like wings, you can connect to their bases and feed power directly from the on/off switch * With the batteries I`m using AA-1700 mah, you have to turn off brown out protection to allow the processor to go under 3 and 1/2 volts or so, you also need to keep the batteries fresh * The four battery clip is a little large and collides with the top of the back, shim it in the back so it leans forward, that works. That`s it!! Have fun programming your MouseBot!!! Author's Assigned Keywords: Robots BEAM Robots picAxe robotics picAxe 08m (ad) Wanna Super Mouse? Start with a Standard One and Upgrade! Take an innocent little twenty dollar wall follower mouse, add another twenty to motorize and electronic-ize it, and you've got a pretty fun object avoiding, wall following mouse.
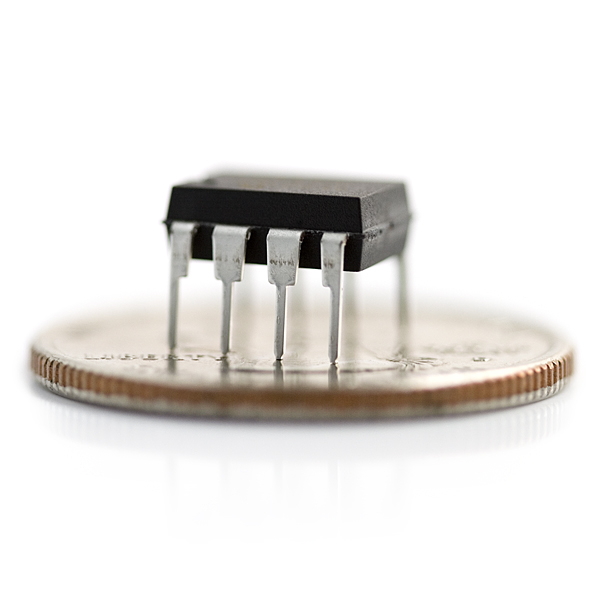
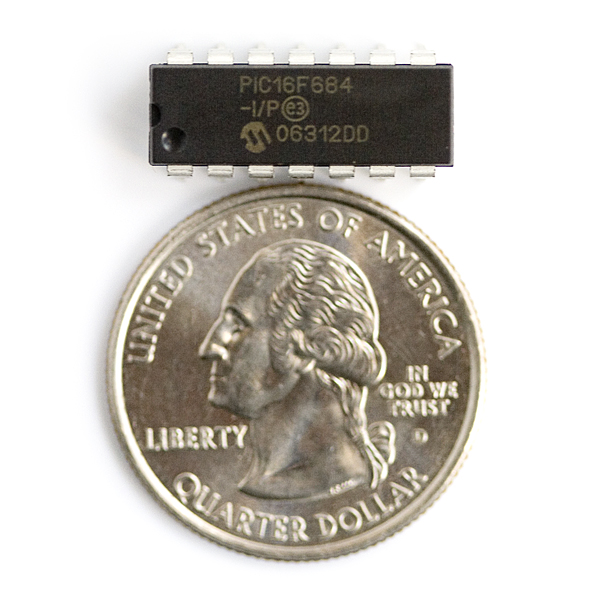
I played around with the motors, though cheapo's they are pretty efficient and the maximum current drain per motor is less than 500 Ma... A one Amp Motor driver will work nicely. That means I can run the whole enchilada with a pic or even picAxe chip and something to drive the current to the wheels. How the Original Wall Follower Mouse Bot Works Just one mechanical "feeler" drives a switch that turns on both motors until it builds enough pressure to switch the motor off, pulling away from the wall and switching the drive motor on again.
It works. Of course it wiggles a lot. Undressing The Mouse Basically, it's most often sold as a kit of parts. It requires basic soldering skills and ability to put self tapping screws into too soft plastic while not stripping the threads. Bending The Brains Bracket You need a bracket for the picAxe, so I took the bare PC board and experimented with mounting it inside the mouse body. Clearance is tight in there, so I had to make sure there was enough room to allow me to mount the IR Detector, low, and in roughly in the area of the bot's nose, but set well back in the plastic.
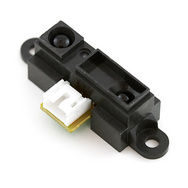
A little sticky back tape and I get a chance to see if I have the clearance for the IR "nose" as I call it, the placement of the IR generator diodes which stick out of the eye sockets and provide illumination for the "nose," and make sure their is room for the batteries. Four AA cells. Looks good now. Ready to move ahead. MouseBot's Brain Transplant Here's the basic circuit of the mouse's nose, er, uh, eyes... Basically the mouse's sensory input from the outside world. ... Requires a Little Mechanical Engineering I did this very scientifically, I stuffed the IR emitter diodes into the circuit boards, lined up the PC board...
Then I just guestimated using a magic marker. Drilled, and voila! Eyes looking protrusions. I put a little heat shrink sleeve on the body of each of the IR LEDs so I could keep the IR outside of the clear cover, and keep the IR detector inside the plastic body. I did experiments... To test how to best get the nose/eyes to work. Eye Details These are the detailed shot of the LED eyes, showing how to make the heat shrink keep light outside the mouse body.
One Last Check of the Sensor Now that the parts are soldered on the board we can stick the body into place and make sure everything fits. If it doesn't we will have an issue. Fortunately, it all fits rather nicely. In Skin Detector Testing The moment of truth. Actually demonstrating MouseBot's external sensitivity. His IR "whiskers" so to speak.
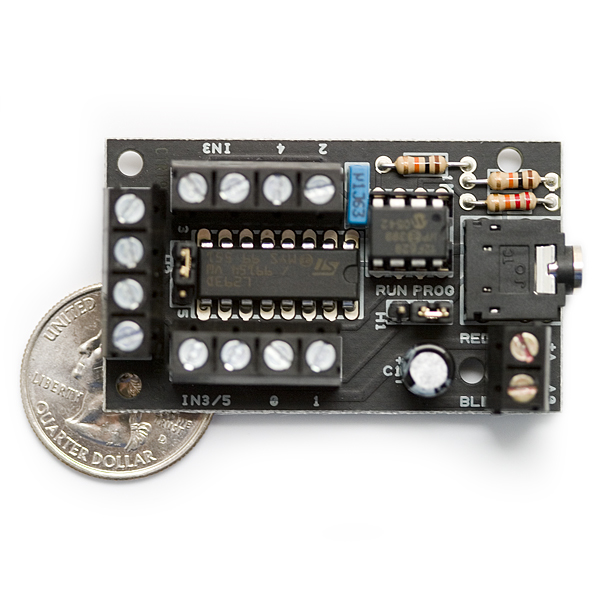
Everything still looks good. So let's shoot the juice to it and see how it runs. No longer a blind mouse, we need to put some electrons into those motors. Next Hooking Up The Mouse Motors Only this time we are controlling the motor's on and off time with transistor switches. Now we can drive the mouseBot in the same way as the wall follower, but it is no longer necessary to use the little bit of spring wire and a switch. Now we are using the sensory parts so we replace the mechanical arrangement with an IR beam of invisible (to humans) light.
Some Software to Inspire The picAxe Basic program brings some civilizing possiblities. For example, rather than having the mouse constantly turning left, then right, then left as it moves along the way, I gave it sort of a long long short kind of deal...
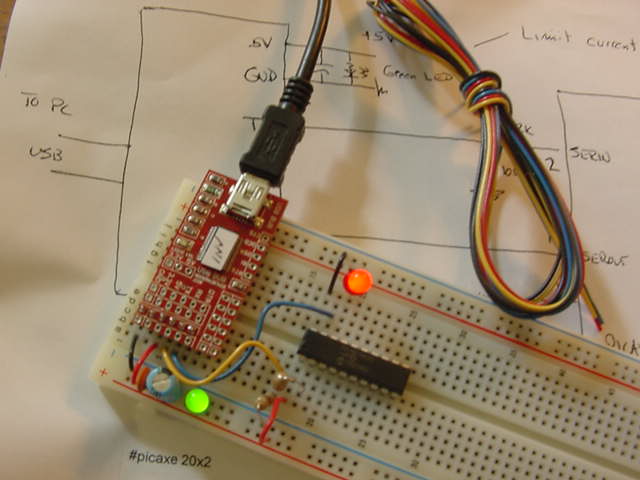
Say you start a wall-follower in the middle of a room. If it is dumb, it will go around in tight circles, if not so dumb, it would simply widen the circles... In software I go Two Motors On, Read Beam, If broken, only One motor on. So it goes in straight lines till it comes to an obstacle. As long as the IR detector indicates a wall, it will begin "wall following" but when it's out in the open on it's own, it goes on a journey more or less straight ahead, till it finds a wall. ---------------------------------------- ' ------------------------------------------------------------ ' BEAM bot Brains ' ' Basic Operation of mouse as "wall hugger" just like original ' Except for: ' IR detector "whiskers" lets the mouse find it's way ' Follows walls without physically touching ' Still has basic motor control with microcontroller picAxe m8 ' Copyright 2008 Jim Huffman ' Permission granted to experimenters to use all or part ' Note copyrighted material frequency chart at the end ' Basic Interpreter Directives #picaxe 08m ' Microprocessor pinouts and layouts 08m symbol LED = 0 '(leg 7) Serout/LED symbol rightDrv = 1 '(leg 6) High = motor on symbol pout = 2 '(leg 5) PWMout2 symbol IRin = 3 '(leg 4) Input only pin3 symbol leftDrv = 4 '(leg 3) High = motor on ' (leg 1 Vdd, leg 8 = Vss, leg 2 = Serial In) symbol spkr = 0 'extra symbol, speaker drive ' Variables used in program symbol xCnt = b0 symbol rightDrvFlag = b1 symbol leftDrvFlag = b2 symbol objDetFlag = b3 symbol rightDrvTime = b4 symbol leftDrvTime = b5 init: ' Initialize chip so OK with low Vcc supply disablebod setfreq m4 ' flash LED high LED pause 1000 low LED pause 1000 'wait for Panic resets, etc... ' initialize variables leftdrvTime = 120 ' Permits balancing forward motion rightDrvTime = 100 ' allows motor speed balancing low rightDrvFlag, leftDrvFlag, objDetFlag, xCnt ' initialize values ' Main driving loop avoids walls main: gosub driveforward pause 10 goto main ' Move forward one time after the other - makes mouse wiggle driveforward: gosub objDetect 'makes 1/2 wiggle unless there is an object ' the other 1/2 wiggle even if there is a wall high leftDrv pause leftDrvTime low rightDrv,leftDrv 'stop\ pause 10 return ' Driving commands (turns) stick in the appropriate spots turnRight: high rightDrv pause rightDrvTime low rightDrv,leftDrv 'stop return turnLeft: high leftDrv pause leftDrvTime low rightDrv,leftDrv 'stop return ' If an object is "sniffed out" then set objDetFlag high objDetect: pwmout pout, 22, 50 '25, 52 ' 26 usec period = 38.4 kHz pause 3 ' Begins continuous output PWM if pin3 = 0 then ' Object Detected pause 3 pwmout pout, 0, 0 ' stop the continuous pulse output else ' 1/2 wiggle (unless there's a wall) high rightDrv pause rightDrvTime low rightDrv,leftDrv 'stop pause 10 endif pwmout pout, 0, 50 ' stop the continuous pulse output return MakeSound: ' fast-beep make a squeek... setfreq m8 'kick into high-speed mode for xCnt = 100 to 130 pulsout spkr, xCnt next xCnt low spkr setfreq m4 return ' Chart of frequencies courtesy of PHAnderson... '------------------------------------------------ ' From IR_1.Bas ' ' copyright, Peter H Anderson, Baltimore, MD, May, '04 ' #rem ' PWMOut pout, Period, DutyCycles PWMOut pout, 25, 52 ' 38.4 kHz PWMOut pout, 24, 50 ' 40.0 kHz PWMOut pout, 23, 48 ' 41.6 kHz PWMOut pout, 22, 46 ' 43.5 kHz PWMOut pout, 21, 44 ' 45.5 kHz PWMOut pout, 20, 42 ' 47.6 kHz PWMOut pout, 19, 40 ' 50.0 kHz PWMOut pout, 18, 38 ' 52.6 kHz PWMOut pout, 17, 36 ' 55.5 kHz PWMOut pout, 16, 34 ' 58.8 kHz #endrem It's Easy To: C - What - I - Can - Do • Sign up - Get ID and Password• Plan and Create a Project That Someone Might Enjoy and May Even Want to Build• Link to your creation on your favorite social networking site or blog.• Become famous! Because your projects get a lot of Hits!
|
By Creators DoctorZoidberg: Converting a Flashlight to LED DoctorZoidberg: Home Project: MUTE TV Wearable TV Muter! DoctorZoidberg: Scare Crow - For Modern Gardens - Home Project jim: CwhatIcanDo Website jim: Tour This Website PaulSandin: Butler, a low-cost mobile robot base WeRbots: BEAM BOT: HexBug Exposed! WeRbots: Buggy Bot: Wire Frame Bot Body WeRbots: Easy Cheap Robot Weekend Project WeRbots: RFL Robot Out Of The Box Experience WeRbots: Robot Man: With Robot Demos WeRbots: Build Your Own Track Drive Robot WeRbots: Build a Robot In 5 Minutes WeRbots: i-Mon App WeRbots: How To Make A Virtual Robot in FLASH WeRbots: Droid From Motorola :: A Robot ? WeRbots: Robots Almost Anyone Can Afford WeRbots: How To Build a Robot in a Box WeRbots: picAxe 18m2 for robotics WeRbots: Build a Respectable Autonomous Robot WeRbots: On Line Neighborhood Watch WeRbots: Pong))))) WeRbots: Roboteer`s Guide to BeagleBone Black WeRbots: Autonomous Robot PVC "Pickup Truck" |
By Keywords Action Script 2: How To Make A Virtual Robot in FLASH Ajax: CwhatIcanDo Website Ajax: CwhatIcanDo Specs: RC2 Ajax: battle Android: Droid From Motorola :: A Robot ? Android: battle batting cage installation: Home Installation of a 4 Section In-Ground Batting Cage BEAM Robots: BEAM BOT: HexBug Exposed! BEAM Robots: picaxe 8m: Wall Follower Mouse gets Majorly Modded BEAM Robots: How to build simple analog balancing robots BEAM Robots: battle Block Watch Cam: On Line Neighborhood Watch Cheap Robot: Easy Cheap Robot Weekend Project Cheap Robot: How To Build a Robot in a Box Cheap Robot: Autonomous Robot Built From Power Chair Wheelchair commercial killer: Home Project: MUTE TV Wearable TV Muter! Convert Your Flashlight to LED: Converting a Flashlight to LED Create a Project: HELP :: How To Create a Project CwhatIcanDo HELP: HELP :: How To Create a Project Do it Yourself: Robots Almost Anyone Can Afford Do it Yourself: Scare Crow - For Modern Gardens - Home Project Do it Yourself: Wheelchair Works 3 Ways: Manual, R/C, and Autonomous Do it Yourself: On Line Neighborhood Watch Droid Smart Phone: Droid From Motorola :: A Robot ? Easy to Make Robot: Easy Cheap Robot Weekend Project entertainment: Home Project: MUTE TV Wearable TV Muter! FLASH Applications: How To Make A Virtual Robot in FLASH HELP: Tour This Website How To: CwhatIcanDo Website How To Build Cheap Bots: Robots Almost Anyone Can Afford How To Build Cheap Bots: How To Build a Robot in a Box How To Website: Tour This Website How To Website: CwhatIcanDo Website Infrared Proximity Sensor: Build Your Own Track Drive Robot IR Detector: Build Your Own Track Drive Robot Lighting Projects: Converting a Flashlight to LED logic analyzer: An affordable Logic Analyzer for the workbench. multi: Multi Media Messaging Device Mute the TV: Home Project: MUTE TV Wearable TV Muter! open source: An affordable Logic Analyzer for the workbench. picAxe: Build Your Own Track Drive Robot picAxe: picAxe 18m2 for robotics picAxe 08m: Robots Almost Anyone Can Afford picAxe 14m: picAxe 14m Motor Driver Board: Make Your Own picAxe 14m: How To Build a Robot in a Box picAxe 18m2: picAxe 18m2 for robotics picAxe 18m2: Weekend Project: Get Started With Robots picAxe 18m2: Build a Robot From A Power Wheelchair picAxe 18m2: Autonomous Robot Built From Power Chair Wheelchair picAxe 18m2: Wheelchair Works 3 Ways: Manual, R/C, and Autonomous picAxe 18x: How To Build a Robot in a Box picAxe 18x: picAxe 18m2 for robotics picAxe 18x: Build a Robot From A Power Wheelchair power wheelchair: Wheelchair Works 3 Ways: Manual, R/C, and Autonomous Quick Build Robot: Build a Robot In 5 Minutes RFL Robots: Building an RFL Inspired Upright Robot Base RFL Robots: RFL Robot Out Of The Box Experience robot bending: Morphibian Land Shark robot bending: Build a Robot From A Power Wheelchair Robot Man: Robot Man: With Robot Demos Robot Motor Control: Build the L298 H-Bridge Motor Control Robot Motor Control: Robot Basics Robot Motor Control: picAxe 14m Motor Driver Board: Make Your Own Robot Motor Control: Buggy Bot: Wire Frame Bot Body Robot Motor Control: picAxe 8 bit Motor Controller: Look Inside Robot Motor Control: How to build simple analog balancing robots Robot Motor Control: Build a Robot From A Power Wheelchair Robot Motor Control: Autonomous Robot Built From Power Chair Wheelchair Robot Pets: DogBot the Robo Dog : Robotic WatchDog Robot Pets: Operation of the Tri-Bot From Wowwee! Robot Pets: Robot Man: With Robot Demos robotics: Droid From Motorola :: A Robot ? robotics: Easy Cheap Robot Weekend Project Robots: BEAM BOT: HexBug Exposed! Robots: Robot Basics Robots: Buggy Bot: Wire Frame Bot Body Robots: Build a Robot In 5 Minutes Robots: Build Your Own Track Drive Robot Robots: Easy Cheap Robot Weekend Project Robots: How To Build a Robot in a Box Rumble Bot Conversions: Robots Almost Anyone Can Afford Security System: On Line Neighborhood Watch Select or type in a Keyword: Converting a Flashlight to LED track drive robot: Build Your Own Track Drive Robot Virtual Pet Robot: How To Make A Virtual Robot in FLASH web: CwhatIcanDo Website web 2.0 site: CwhatIcanDo Website web 2.0 site: CwhatIcanDo Specs: RC2 Weekend Project Robots: Easy Cheap Robot Weekend Project Weekend Project Robots: Weekend Project: Get Started With Robots |
Click To Expand / Contract Menus. View by Creator, Category, Keywords or Number of Views.